Pages

Showing posts with label vista. Show all posts

Tuesday, January 17, 2017

Enable DMA in Windows XP Vista and Windows 7 to speed up the system

Direct memory access (DMA) is a feature of modern computers and microprocessors that allows certain hardware subsystems within the computer to access system memory for reading and/or writing independently of the central processing unit.
DMA is used for transferring data between the local memory and the main memory. Computers that have DMA channels can transfer data to and from devices with much less CPU overhead than computers without a DMA channel.

This is especially useful in real-time computing applications where not stalling behind concurrent operations is critical. Another and related application area is various forms of stream processing where it is essential to have data processing and transfer in parallel, in order to achieve sufficient throughput.
Now, know how to Enable Direct Memory Access (DMA) in order to speed up your system.

You must be logged on as an administrator to perform these steps.

Direct memory access (DMA) is usually turned on by default for devices such as hard disks and CD or DVD drives that support DMA. However, you might need to turn on DMA manually if the device was improperly installed or if a system error occurred. Perform the following steps to do this.

First Open Device Manager.
  • Right-click on My Computer, select Properties
  • Select the Hardware tab
  • Click the Device Manager button
For Windows XP
  1. Double-click IDE/ATAPI controllers
  2. Double-click on the Primary IDE Channel
  3. Click on the Advanced Settings tab (as shown in figure) The tab may or may not be available for each option. It is only available in Primary and Secondary Channels.
  4. Set the Transfer Mode to "DMA if Available" both for Device 1 and 0
  5. Click OK
  6. Perform the same operation for other items in the list, if applicable.
For Windows Vista and Windows 7
  1. In the left pane, click the plus sign next to IDE ATA/ATAPI controllers to expand it.
  2. For each icon that has the word Channel as part of its label, right-click the icon, and then click Properties.
  3. Click the Advanced Settings tab, and then, under Device Properties, select the Enable DMA check box.
  4. Click OK.
Read More..

Monday, December 5, 2016

Trick to Speed Up Windows 7 and Vista Boot Up

Speed Up Windows 7 and Vista Boot Up
There are many ways to decrease booting time and speed up start, such as using third party programs such as Startup Manager to manage programs running automatically. Windows 7 and Windows Vista users running dual-core, quad-core or other multi-core or multi-processors computer can try the following trick to make Windows boots faster.
  • Press Win + R to open “Run” dialog window
  • Type MSConfig into the text box after “Open”.
  • Go to Boot tab.
  • For dual-boot or multi-boot system, make sure that the operating system to make the change is selected.
  • Click on Advanced options button.Speed Up Windows 7 and Vista Boot Up
  • Tick the check box for Number of processors, and then select the maximum number count of CPU core processors value from the drop down list.
  • Click OK twice to exit System Configuration.
  • Restart computer.
Once enabled, Windows operating system will use all available (or selected number of) processor cores to run the boot up algorithms, and this potentially make the startup speedier and faster, with less waiting time on black screen and logon screen. User with single core computer unlikely to find the trick useful though.
Read More..

Thursday, May 5, 2016

Change size of Vista icons instantly

Vista provides a great handy way to increase the size of Desktop icons instantly. If we open a word file or simply a web page to zoom the page we press the ctrl key and scroll the mouse. Same way click on Vista desktop and scroll the mouse upwards to increase the size of icons and scroll downwards to decrease.
Read More..

Sunday, April 24, 2016

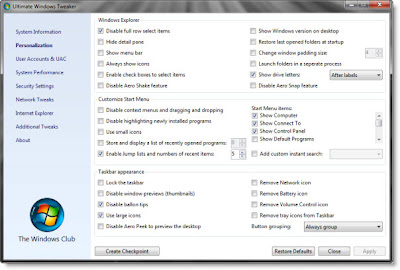
Tweak Windows Vista and Windows7 using Ultimate Windows Tweaker

Tweak Windows Vista and Windows7 using Ultimate Windows Tweaker
Ultimate Windows Tweaker is a free tweak utility available for tweaking and optimizing Windows 7 and Windows Vista (32 bit & 64 bit). This utility makes your system faster and more stable. Same utility for windows7 as well as windows Vista. It auto-detects the operating system and functions accordingly.

It doesnt requires install just run the setup and it unpacks over 150 tweaks and settings. Just download the zip file, extract it and run the setup.

Please create a system restore point before using this utility for safety.

Download Utility here
Read More..

Tuesday, February 16, 2016

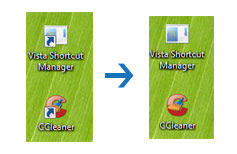
How to Remove Arrows on Shortcuts in Windows Vista

Remove Arrows on Shortcuts in Windows
Each of icons created in Windows Vista has a shortcut number associated with it, which is 29. In order to remove the arrow from the shortcut, we will redirect number 29 to a different master icon file through simple registry hack:
  • Click on Start button, then type regedit in the search bar, then hit enter key.
  • Navigate to HKEY_LOCAL_MACHINESOFTWAREMicrosoftWindowsCurrentVersionexplorer.
  • Right click on Explorer, choose New -> Key, and name the new key as Shell Icons.
  • Right click on Shell Icons, choose New -> String Value, then name it as 29.
  • On the right panel, double click on 29 and assign it with the value as %SystemRoot%noarrow.ico,0.
  • Download noarrow.ico, save it to root directory, C:Windows.
  • In order to make it effective of the registry changes, logoff from the computer and login again.
Once above steps are done, you will notice that all shortcuts created previously or any newly created shortcuts no longer have arrow attached to it.
Read More..

Friday, February 5, 2016

How to enable Press Ctrl Alt Del Secure Logon On Windows 7 or Vista

HP 2009M 20-Inch HD LCD Monitor
Method 1: User Accounts Advanced Settings

  1. Click start and type netplwiz into Start Search box, it opens the User accounts dialogbox.
  2. Go to Advanced Tab.
  3. Under “Secure logon” section, select and check the checkbox for Require users to press Ctrl+Alt+Delete option
  4. Click apply and OK.
Method 2: Registry editing.
  1. Click start and type netplwiz into Start Search box, it opens Registry editor.
  2. Navigate to the following registry key:HKEY_LOCAL_MACHINESoftwareMicrosoftWindowsCurrentVersionPoliciesSystem
  3. In the right pane, double click on DisableCAD registry key value, and set its value data to 0

Method 3: Using Group policy.
  1. Click on Start button, and type secpol.msc into Start Search box, and hit Enter to open the Local Security Policy Editor.
  2. Navigate to Security Settings >> Local Policies >> Security Options.
  3. In the right pane, double click on Interactive logon: Do not require CTRL+ALT+DEL.
  4. Select and set the radio button of Disabled.
  5. Click Apply and OK.
Read More..