Pages

Showing posts with label windows. Show all posts

Wednesday, January 25, 2017

You can change your Windows Password if forget the current password

passw


1st step: go to run then type this code lusrmgr.msc and then enter.
computer tricks


2nd step: open a new window then click users folder 


3rd step: The you can see your windows username 


4th step: follow my image instruction


Read More..

Tuesday, January 17, 2017

Enable DMA in Windows XP Vista and Windows 7 to speed up the system

Direct memory access (DMA) is a feature of modern computers and microprocessors that allows certain hardware subsystems within the computer to access system memory for reading and/or writing independently of the central processing unit.
DMA is used for transferring data between the local memory and the main memory. Computers that have DMA channels can transfer data to and from devices with much less CPU overhead than computers without a DMA channel.

This is especially useful in real-time computing applications where not stalling behind concurrent operations is critical. Another and related application area is various forms of stream processing where it is essential to have data processing and transfer in parallel, in order to achieve sufficient throughput.
Now, know how to Enable Direct Memory Access (DMA) in order to speed up your system.

You must be logged on as an administrator to perform these steps.

Direct memory access (DMA) is usually turned on by default for devices such as hard disks and CD or DVD drives that support DMA. However, you might need to turn on DMA manually if the device was improperly installed or if a system error occurred. Perform the following steps to do this.

First Open Device Manager.
  • Right-click on My Computer, select Properties
  • Select the Hardware tab
  • Click the Device Manager button
For Windows XP
  1. Double-click IDE/ATAPI controllers
  2. Double-click on the Primary IDE Channel
  3. Click on the Advanced Settings tab (as shown in figure) The tab may or may not be available for each option. It is only available in Primary and Secondary Channels.
  4. Set the Transfer Mode to "DMA if Available" both for Device 1 and 0
  5. Click OK
  6. Perform the same operation for other items in the list, if applicable.
For Windows Vista and Windows 7
  1. In the left pane, click the plus sign next to IDE ATA/ATAPI controllers to expand it.
  2. For each icon that has the word Channel as part of its label, right-click the icon, and then click Properties.
  3. Click the Advanced Settings tab, and then, under Device Properties, select the Enable DMA check box.
  4. Click OK.
Read More..

Saturday, January 14, 2017

Make Your Windows 7 Genuine by Command Prompt Computer Tips

Make Your Windows 7 Genuine by Command Prompt: Computer Tips


How to make your windows 7 genuine by command prompt. So, follow my image instruction ...Lets Go............

# 1st step: Go to start menu and type cmd and right click on the cmd icon

Windows 7 Genuine1


# Step 2: then click in "Run as administrator" then press ok
 Windows 7 Genuine2


# Step 3: Type this command " SLMGR -REARM " then press ok

 Windows 7 Genuine3

# Step 4:  Wait a seconds
 Windows 7 Genuine4


# Step 5: then successfully complete this task and restart your computer and get your windows genuine,
 Windows 7 Genuine5


Read More..

Wednesday, January 11, 2017

Mega Tutorial For Windows keyboard shortcuts

Mega Tutorial For Windows keyboard shortcuts


Alt + F File menu options in current program.
Alt + E Edit options in current program
Alt + Tab Switch between open programs
F1 Universal Help in almost every Windows program.
F2 Rename a selected file
F5 Refresh the current program window
Ctrl + N Create a new, blank document in some software programs
Ctrl + O Open a file in current software program
Ctrl + A Select all text.
Ctrl + B Change selected text to be Bold
Ctrl + I Change selected text to be in Italics
Ctrl + U Change selected text to be Underlined
Ctrl + F Open find window for current document or window.
Ctrl + S Save current document file.
Ctrl + X Cut selected item.
Shift + Del Cut selected item.
Ctrl + C Copy selected item.
Ctrl + Ins Copy selected item
Ctrl + V Paste
Shift + Ins Paste
Ctrl + K Insert hyperlink for selected text
Ctrl + P Print the current page or document.
Home Goes to beginning of current line.
Ctrl + Home Goes to beginning of document.
End Goes to end of current line.
Ctrl + End Goes to end of document.
Shift + Home Highlights from current position to beginning of line.
Shift + End Highlights from current position to end of line.
Ctrl + Left arrow Moves one word to the left at a time.
Ctrl + Right arrow Moves one word to the right at a time.
Ctrl + Esc Opens the START menu
Ctrl + Shift + Esc Opens Windows Task Manager
Alt + F4 Close the currently active program
Alt + Enter Open the Properties for the selected item (file, folder, shortcut, etc.)
Read More..

Thursday, December 22, 2016

Download Free 140 Page Windows 7 Product Guide from Microsoft

Microsoft Windows 7 has not only enhanced its software application but also marketing and customer services. Though resting having established its dominance in computer operating systems, Microsoft shows that it is not on its laurels or planning to relax its grip on the market. Apart from Microsoft Answers, the Q&A technical support launched in December 2008, and Windows 7 Solution Center, Microsoft is offering the new Windows 7 Product Guide which can be downloaded for free.

The 140-page overview provides a detailed and comprehensive guide to users on how to make full use of Windows 7. The product guide is organized into three sections – Introduction , Windows 7 for You, and Windows 7 for IT Professionals. It also has an overview of the Microsoft Desktop Optimization Pack which explains how companies can use the applications to manage and optimize their desktop functions.

While the Product Guide serves as a manual, the Windows 7 Solution Center offers troubleshooting tips to fix problems. The tech support website is divided into several categories including installation, upgrading, activation, performance, safety, Internet Explorer, entertainment, etc. Although the features and functions of the latest operating systems get increasingly more sophisticated and advanced, users have no excuse to reject Windows 7 due to ignorance or the lack of familiarity and support.

Download Windows 7 Product Guide from Microsoft Download Centre

Read More..

Monday, December 5, 2016

Trick to Speed Up Windows 7 and Vista Boot Up

Speed Up Windows 7 and Vista Boot Up
There are many ways to decrease booting time and speed up start, such as using third party programs such as Startup Manager to manage programs running automatically. Windows 7 and Windows Vista users running dual-core, quad-core or other multi-core or multi-processors computer can try the following trick to make Windows boots faster.
  • Press Win + R to open “Run” dialog window
  • Type MSConfig into the text box after “Open”.
  • Go to Boot tab.
  • For dual-boot or multi-boot system, make sure that the operating system to make the change is selected.
  • Click on Advanced options button.Speed Up Windows 7 and Vista Boot Up
  • Tick the check box for Number of processors, and then select the maximum number count of CPU core processors value from the drop down list.
  • Click OK twice to exit System Configuration.
  • Restart computer.
Once enabled, Windows operating system will use all available (or selected number of) processor cores to run the boot up algorithms, and this potentially make the startup speedier and faster, with less waiting time on black screen and logon screen. User with single core computer unlikely to find the trick useful though.
Read More..

Saturday, October 15, 2016

HD Windows Logo Wallpaper for Desktop

To save the image, first click to enlarge the image, then right-click on it and click on Save Image As.. or simply right-click on the thumbnail and click on Save Link AS..
Note: all are high resolution images greater than 1024 x 728 px.


Orange windows logo hd wallpaper
Black Shiny Windows HD Logo WallpapeTransparent windows Logo Wallpaper


Windows7 Logo Wallpaper
Windows Vista Aura WallpaperWindows Logo


Windows Logo Wallpaper
Golden Windows Logo WallapaperDark Windows Logo Wallpaper
Read More..

Friday, October 7, 2016

How to allow users to Run only specified programs in Windows 7


You can allow users to run only specified programs in Windows 7 operating systems. It is up to you if you want your shared computer to allow users to run only specified programs in Windows 7. A shared computer in an office, for example, can be set in the same way if the company does not want the employees to run all types of programs. You can allow the users to run only specified programs in Windows 7 by using the Local Group Policy. However, you cannot do this in the Home editions of Windows 7 as it does not provide the Local Group Policy Editor.
Click on the Start button.

Type “gpedit.msc” in the search box of the Start menu and press the Enter button on the keyboard.
Local Group Policy Editor will open. Scroll down to “User Configuration”, “Administrative Templates” and then “System” on the left hand side of the window pane.
On the right hand side of the window, under “Setting”, navigate and double-click on “Run only specified Windows applications”.


Select Enabled from the window.
Click on “Show” under Options. 


The Show Contents window pane will appear. Here you can type the applications you want to let the users run.
After you are done, click on the OK button.
Close the Local Group Policy Editor.


After this, if someone attempts to run an app which was not specified by you, he will get this error message:


This feature to allow users to run only specified programs in Windows 7 is the best at preventing the users from accessing applications you don’t want them to use on a particular computer.

Read More..

Tuesday, September 27, 2016

Windows 7 Hidden Theme

Computer Tips
 computer theme

windows 7- as soon as the user knows that windows 7- This is the default theme that already.Under the theme of Windows 7 - the custom wallpaper, sounds, icons, task-bar, etc. are arranged. A certain number of the theme you want to use any of the themes that are downloaded from the Internet. But you know your being aware of the location of the five theme categories are concealing your Windows PC! Yes, absolutely the truth. Now just a little  pain in my Windows 7 PC in 5minutes time. From the start  in the search bar: Windows Globalization MCT write.Now press  Enter. Then open a new window.“ll see five folders in a new window.Now that MCT-AU folder into the folder Theme - waited in AU. Theme-click Windows 7 - The theme will be installed in Australia. Similarly, one by one, MCT-CA, MCT-GB, MCT-US, MCT
-ZA folders respectively entered into the Theme folder CA. theme, GB. Theme, US. Theme and ZA.Theme folders click will install the remaining four themes on your PC. This theme is the theme of four in Canada, the United Kingdom, the United States and South Africa.
 
Read More..

Thursday, August 11, 2016

A Project on Windows NT


Some of the important points are listed below:

  • Boot Loader Phase
  • Kernel loading phase
  • Session Manager
  • Winlogon
  • Releases
  • Major features
  • Architecture of Windows NT
  • Hardware requirements

This article is shared by one of the reader: SAHADEV KADLAG
Download the file here:

  • WINDOWS_NateWare.zip - The pptx file
  • windows_NToriginal&final.zip - A Documentation on the project
Read More..

Saturday, June 4, 2016

How to Turn On or Enable Hibernation in Windows 7

Note Windows 7 doesnt support Hibernate on System with Ram of 4GB or more.

To Turn On or Enable Hibernation.
  1. Click on Start.
  2. Type cmd. Now instead of pressing Enter, press Ctrl+Shift+Enter to run cmd with administrator rights.
  3. or Browse to C:WindowsSystem32
  4. Right Click on cmd.exe and select Run as Administrator
  5. Type powercfg /hibernate on and hit enter.
  6. Now go to Control Panel >> System and Security >> Power Options.
  7. Click on Change plan settings link of the active power plan.
  8. Click on Change advanced power settings link.
  9. Expand the Sleep tree.
  10. In the drop down box of Allow Hybrid Sleep, select Off as new setting to disable and turn off Hybrid Sleep.

To Turn off or Disable Hibernate.
  1. Click on Start.
  2. Type cmd. Now instead of pressing Enter, press Ctrl+Shift+Enter to run cmd with administrator rights.
  3. or Browse to C:WindowsSystem32
  4. Right Click on cmd.exe and select Run as Administrator
  5. Type powercfg /hibernate off and hit enter.

Now, to Set the power button option as Hibernate,

  • Click on Start.
  • Right-Click on the Power Button.

Enable Hibernate in Windows 7
  • Click on Properties.
  • Drop-down the Power Button Action Box.

Enable Hibernate in Windows 7
  • Select Hibernate.
  • Click on Apply and then Click on OK.
Read More..

Tuesday, May 10, 2016

How to Create delete a Hard Disk Partition in Windows 7

How to Create/delete a Hard Disk Partition in Windows 7


Hello Everyone, Do you want to Create/delete a Hard Disk Partition in Windows 7 then check this video.

Read More..

Thursday, April 28, 2016

Use Tabs in Windows Explorer like in mozilla Firefox

Tabs have made the way of surfing the Internet a lot easier. Using tabs in the browsers have eased up the trouble faced when switching between all the windows opened. Tabs are really the need of today that prevents from cluttering the desktop with lots of windows.

Using Tabs in the internet browsers like Firefox, Opera, IE7 and Chrome etc have made me feel the need of tabs in the Windows Explorer as well and I think there are many others like me who can’t live without tabbed browsing in the explorer.

Here is a way with which we can add tabs to the Windows Explorer, for example we can create one tab that contains all Windows Explorer folders, one for Internet and one for some other application.

Method 1:
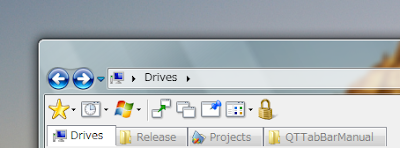
QT TabBar

tabs for Windows Explorer
QTTabBar is an Add-In that gives Tab Browsing Feature to your Explorer. Just download and run this tool, and after that the computer needs to be restarted and you need to activate the toolbar in the View -> Toolbars menu.
Now every time you click on a new folder, it will be opened in a new tab. isn’t it cool?
Download QT TabBar

Method 2:
Window Tabifier

tabs for Windows Explorer
This program allows us to host several open Windows in one parent window so that you can easily access and navigate between them, as well as clean up space in the taskbar. This will allow us to group similar Windows together, easily navigate between them and clean up space in the taskbar.
Download Window Tabifier
Read More..

Sunday, April 24, 2016

Tweak Windows Vista and Windows7 using Ultimate Windows Tweaker

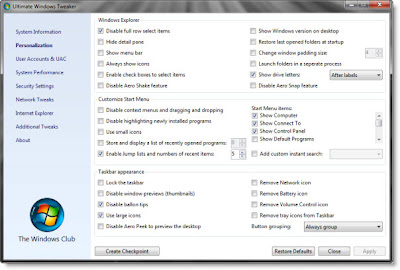
Tweak Windows Vista and Windows7 using Ultimate Windows Tweaker
Ultimate Windows Tweaker is a free tweak utility available for tweaking and optimizing Windows 7 and Windows Vista (32 bit & 64 bit). This utility makes your system faster and more stable. Same utility for windows7 as well as windows Vista. It auto-detects the operating system and functions accordingly.

It doesnt requires install just run the setup and it unpacks over 150 tweaks and settings. Just download the zip file, extract it and run the setup.

Please create a system restore point before using this utility for safety.

Download Utility here
Read More..

Thursday, March 24, 2016

Fix Bugs in Windows Media Player using Fix WMP Utility

Windows Media Player is a default media player in windows and is used by most of the windows users. Its look and feel are good so even i prefer using WMP. But over a period of time, some bugs are created. A great utility is available to fix these bugs. "Fix WMP Utility v 1.0"

Its a free utility developed by The Windows Club. It re-registers all the concerned Windows Media dll files required for the smooth functioning of Windows Media Player.If you experience any problem or you get error messages while playing any audio or video in WMP you can run this utility to fix the issues. It re-registers over 40 dlls required for smooth functioning of Windows Media Player.

Please create a System Restore point before using this utility for safety. However this utility is tested and works fine in Windows Vista and Windows 7 and should work for

all versions of Windows and Windows Media Player.

Below are some screenshots of the software:


Download Fix WMP Utility v 1.0 here
Read More..

Thursday, March 17, 2016

Copy Files with Pause and Resume Feature in Windows


You can copy files from one location to another with Pause feature that is now you can pause your copy paste and resume at your will. What’s more is that you can also increase the speed of the copy paste. Isn’t it cool?

Copy Resume Feature in Windows
Total Copy is a great tool that enables you to copy paste files which can be paused and resume in between along with the increased copy speed.

Features:
  • Pause / Resuming: At any time you may pause the copy-process, and continue later.
  • Auto-pause on any error : If you run out of disk space, the
    network
    goes down or some other error occur, copying is automatically paused, and you may resume when the error is sorted out.
  • Resuming on power failure: If the computer is turned off during the copy process (ex. power-loss or system-crash), Total Copy let’s you resume when you restart.
  • Speed limit : Slows down the copy process, and frees resources to other tasks
  • Faster than Windows : Copies slightly faster than Windows (approx. 10% locally, and 1% on network)
  • Small improvements: Shows copy-speed, a percent-bar and Kbytes remaining.
  • Does not modify Windows’ own copy-function : This program will not alter the existing windows-copy-function
How to use:
Just drag the files using the right mouse button; you will get a menu like the one shown and select “Total Copy here” instead of Windows “Copy here”.

Copy Resume Feature in Windows
Download
Read More..

Tuesday, March 8, 2016

how to recover your windows password

buddy i am going to show you how to recover your windows password.

1st step=connect a pendrive/memory card on computer.

2nd step=follow my image instruction


                                                   go to my computer
                                               

                             click on open control panel
                                                

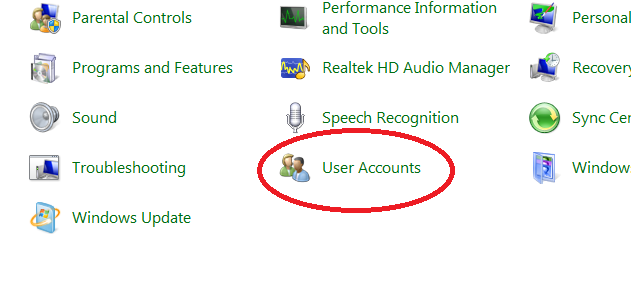
                                                           clck on user account

                                       click on crate a password reset disk

                                           here is put your current password
                                                       

wait until finished progres


click finish
 
how to use this tricks and break windows password

 1st step= restart your computer

2nd step= for test put a wrong password

3rd step=connect your memory card or pendrive where you install recovery file

4th step= put you wrong password  and enter.windows says wrong password ..and you can see reset password option.


5th step=after clickin reset option if you are connect your memory card/pendrive then open a new window.

6th step=click next and enter a new password then finish


  if you can understand then you can watch this video

Read More..